- Détails
- Écrit par : Super User
- Affichages : 2468
Forcer arrêt d'une vm qui ne veut pas s’arrêter depuis la GUI et même en CLI
En mode shell sur le serveur qui héberge la VM N° X
faire :
ps -aux | grep N° de la VM
dans la réponse récupérer l'ID du process qui contrôle la VM (2iem colonne) puis faire
kill ID_NUM
puis forcer l'arrêt
qm stop N° de la VM
- Détails
- Écrit par : Super User
- Affichages : 969
Avec Ansible vous pouvez automatiser des actions sur des machines à distance mais il peut y avoir des soucis avec certaines distributions Linux
Voici quelques liens vers des astuces.
https://writeloop.dev/posts/ansible-missing-sudo-password-error-when-running-playbook-or-ping/
hat was when I realized a simple thing: ansible was able to connect.
The problem was that the ubuntu user on the remote machine, when I ran commands with sudo, was asking for the password!
Then, the fix was simple on the remote machine (ubuntu in this case): I ran some commands to allow the users on the sudo group (which was the case of the ubuntu user) to do sudo passwordless - that was safe in my case because the machine only allowed login as the ubuntu user, with ssh keys, and had fail2ban installed to stop attempts from others to login.
Here are the commands I ran on the remote Ubuntu machine:
# become root:
$ sudo su

# to edit the sudo configuration (this will open vi)
$ visudo
Inside this file, I changed the following configuration:
# Allow members of group sudo to execute any command
# %sudo         ALL=(ALL:ALL) ALL
%sudo   ALL = (ALL) NOPASSWD: ALL
After that, I logged off from the machine, logged in again, and ran sudo su again.
I was then able to run this sudo command without a password.
- Détails
- Écrit par : Super User
- Affichages : 1223
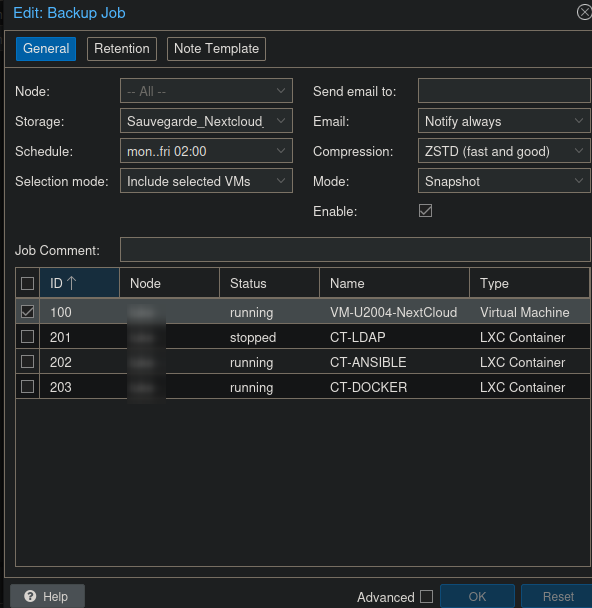
Gestion de sauvegardes Proxmox vers Infomaniak
Comment je gère mes sauvegardes de machines Proxmox de mon infra personnelle ?
Le matériel :
1 serveur Proxmox (Pve) avec des vm qui tournent
1 NAS OpenMediavault (OMV) avec un disque de 1To, à base de carte Odroid HC2
Le logiciel :
1 sauvegarde depuis le Pve vers le NAS réguliérement
1 sauvegarde rclone depuis le NAS vers un dépot SwissBackup tout les jours du dernier dump de machine
Les réglages :
Dans le serveur Pve le NAS est relié en NFS et dans la partie backup on fait :
Dans la configuration du OMV dans Système - Tâches planifiées, je lance un script qui fait les sauvegardes quotidiennement
#/bin/sh
# On sauvegarde le dernier dump
fichier=$(ls /dossierquicontientlessauvegardes/ -Al -s | grep qemu-100 | tail -n 1 | cut -d':' -f 2 | cut -d' ' -f2 ); rclone sync -P /dossierquicontientlessauvegardes/$fichier nomdudepotdesauvegardesInfomaniak:defaultecho sauvegarde de $fichier
# On sauvegarde le dernier logfichier=$(ls /dossierquicontientlessauvegardes/ -Al -s | grep qemu-100 | tail -n 2 | head -n 1 | cut -d':' -f 2 | cut -d' ' -f2 ); rclone sync -P /dossierquicontientlessauvegardes/$fichier nomdudepotdesauvegardesInfomaniak:defaultecho sauvegarde de $fichier
- Détails
- Écrit par : Super User
- Affichages : 1013
Comment faire la copie d'un iso d'un proxmox à un autre directement
Se connecter sur le PM qui contient l'iso
depuis le shell, faire
cd /var/lib/vz/template/iso
puis faire un
scp nomdufichier.iso root@adresseipduproxmoxdestinataire:/var/lib/vz/template/iso
Et c'est tout ! #linux #gnu #virtualisation #proxmox
- Détails
- Écrit par : Super User
- Affichages : 1500
Un shell joli et performent comme sous kali Linux pour votre distribution, et même pour votre W$
C'est possible en suivant ce lien : https://medium.com/@shivam1/make-your-terminal-beautiful-and-fast-with-zsh-shell-and-powerlevel10k-6484461c6efb
Traduction :
Installer ZSH shell pour linux
- Installez zsh avec le gestionnaire de paquet
sudo apt install zsh
2. Faites en le shell par défaut
chsh -s $(which zsh)
3. Redémarrez votre terminal et vous êtes pret (avec ubuntu linux vous devrez vous déconnecter et vous reconnecter)
4. Si vous avez une question de sélection, choisissez 0
Tapez "echo $SHELL" pour vérifier le shell, la réponse doit être : /usr/bin/zsh
Les autres étapes sont toutes les mêmes pour tous les OS
Collez la commande ci-dessous pour installer Oh My Zsh.
sh -c "$(curl -fsSL https://raw.githubusercontent.com/robbyrussell/oh-my-zsh/master/tools/install.sh)"

On va cloner le dépôt dans le dossier personnalisé du théme
git clone https://github.com/romkatv/powerlevel10k.git $ZSH_CUSTOM/themes/powerlevel10k
Téléchargez et installez les polices Patchées Nerd
https://github.com/ryanoasis/nerd-fonts
Download Plugins for autosuggestion and syntax highlighting
git clone https://github.com/zsh-users/zsh-autosuggestions.git $ZSH_CUSTOM/plugins/zsh-autosuggestions
git clone https://github.com/zsh-users/zsh-syntax-highlighting.git $ZSH_CUSTOM/plugins/zsh-syntax-highlighting
Now edit your ~/.zshrc file to use the PowerLeve10K theme, Awesome Patched font, Autocorrection, Autosuggestion and Syntax highlighting.
vim.tiny ~/.zshrc
Find the ZSH_THME and replace it with
ZSH_THEME="powerlevel10k/powerlevel10k"
Also add this line below to use Nerd Patched fonts
POWERLEVEL9K_MODE="nerdfont-complete"
If you want to enable auto correction then find uncomment the line by removing # from
#ENABLE_CORRECTION="true"
//to this
ENABLE_CORRECTION="true"
Now we will add plugins so scroll down a little till you find
plugins=(git)
And now add the plugins which we downloaded, like this
plugins=(git zsh-autosuggestions zsh-syntax-highlighting)